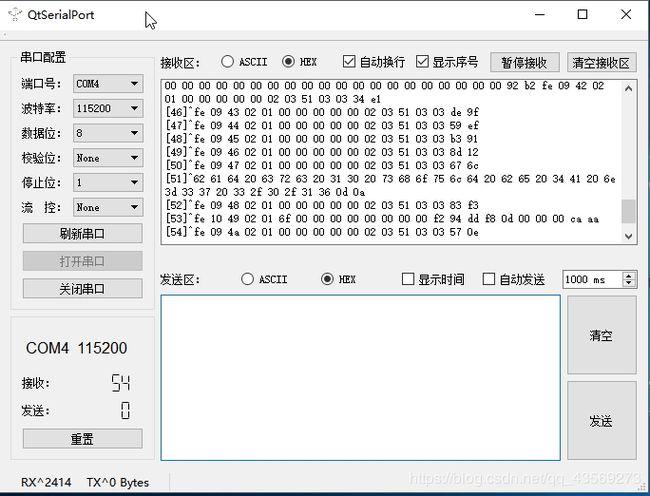
//查找可用的串口foreach(const QSerialPortInfo &info, QSerialPortInfo::availablePorts()) { QSerialPort SerialPort; SerialPort.setPort(info); //解析串口信息 if (SerialPort.open(QIODevice::ReadWrite)) { SerialPortName.push_back(SerialPort.portName()); SerialPort.close(); } } //把端口添加到组合框 for (int i = 0; i < SerialPortName.size(); ++i) { ui->SelectCOM_comboBox>addItem(SerialPortName.at(i)); } 3、打开和设置串口 在这里,我使用点击按钮来触发打开串口事件,在打开按钮的槽函数中进行串口打开就可以打开以后进行串口参数的设置,如波特率、校验位、停止位等这些参数从界面的设置读取,这里给出主要代码,参数直接指定,从窗口获取参数也是同理,只是需要从ui界面获取参数 这里要注意:务必要先打开串口,然后在进行参数设置,否则很有可能出现读取不到数据的情况(很明显的特征就是,串口设备拔掉插上,打开串口也读不到数据或者乱码,拿其他软件打开读一下数据,再切回自己的程序也就可以读到数据) SerialPort->setPortName(SelectCOM_comboBox->currentText()); //获取串口端口号 if(!(SerialPort->isOpen())) //串口没有打开 { if (!SerialPort->open(QIODevice::ReadWrite)) { QMessageBox::information(this, "提示", "串口连接失败,请检查设备是否正确连接"); } else { //QMessageBox::information(this, "提示", SelectCOM_comboBox->currentText() + tr("连接成功")); SerialPort->setBaudRate(115200); //设置波特率115200 SerialPort->setDataBits(QSerialPort::Data8); //8位数据位 SerialPort->setParity(QSerialPort::NoParity); //无校验位 SerialPort->setStopBits(QSerialPort::OneStop); //1位停止位 SerialPort->setFlowControl(QSerialPort::NoFlowControl); //默认无流控 SerialPort->clearError(); SerialPort->clear(); //关联串口数据读取槽函数 connect(SerialPort, &QSerialPort::readyRead, this, &setDialog::slot_serialReadData); //关联串口连接异常处理槽函数 connect(SerialPort, static_cast<void (QSerialPort::)(QSerialPort::SerialPortError)>(&QSerialPort::error), this, &setDialog::handleSerialError); } } 4 、读取数据 串口有数据发过来时会触发串口读信号(readyRead),所以读数据就要将readyRead绑定到读取槽函数,然后直接使用串口的readAll()或者readData()等函数来读取串口数据就可以,读到的数据根据需要进行转码,然后进行显示、保存等操作主要代码如下:绑定信号和槽:connect(SerialPort, &QSerialPort::readyRead, this, &setDialog::slot_serialReadData);QByteArray receiveDate; QTextCodec tc = QTextCodec::codecForName("GBK"); //编码转换,必须转换编码,否则乱码 while(!SerialPort->atEnd()){ receiveDate = SerialPort->readAll(); } if (!receiveDate.isEmpty()) { QString strBuf=tc->toUnicode(receiveDate); //编码转换,必须转换编码,否则乱码 COMRXtextBrowser->append(strBuf); } receiveDate.clear(); 5、发送数据 要发送串口数据也很简单,使用write()函数即可,前提是串口要先打开和设置好参数下面是主要代码: QTextCodec gbk = QTextCodec::codecForName("GBK"); //从Ui文本输入框读取数据 QString strSendMessage = ui->Send_textEdit->toPlainText(); if(ui->TXHex_checkBox->isChecked()) { strSendMessage=hexToString(strSendMessage); //hex格式转化为Qstring } if(ui->TXEnter_checkBox->isChecked()) //添加换行/回车 { strSendMessage+="\r\n"; } QByteArray sendBytes; sendBytes.append(gbk->fromUnicode(strSendMessage)); //编码转换,必须转换编码,否则乱码 if(SerialPort->isWritable()) { SerialPort->write(sendBytes); TXCounter+=sendBytes.size(); ui->TXCountlabel->setText(tr("TX:%1").arg(TXCounter)); } else{ QMessageBox::information(this,"Tip","串口未打开
"); } 6、 关闭串口 关闭串口可以手动通过点击按钮关闭或者在窗口关闭时去关闭串口,为避免出现异常,窗口关闭时把串口也关闭了关闭串口也很简单,使用close()函数就可以代码如下: if(SerialPort->isOpen()) { SerialPort->close(); ui->SeralOperat_pushButton->setText(tr("打开串口")); QMessageBox::information(this,"提示","串口连接断开"); } 7、其他 串口还有很多功能,这里就不一一列举,需要可以去QT助手搜索有哪些方法,如何使用等 最终实现效果如图:3 注意事项和说明1、在工程文件.pro中要添加QT += serialport,否则编译会报错2、串口要先打开,然后进行参数设置,否则容易出现读取不到数据的情况3、 串口数据读取的数据需要进行转码(尤其是和硬件平台通信时),否则中文字符会乱码4、在对ui控件进行操作前,务必要先执行设置ui函数(ui->setupUi(this)),否则执行会出错 写的调试软件还有定时更新串口列表,保存接收数据,发送文件,定时发送等功能,在此不一一详述了我把完整源码奉上,需要参考的伙伴可以直接下载源码,注释写的也很清楚源码请在资源页下载:https://mp-new.csdn.net/mp_download/manage/download/UpDetailed关于如何把自己写的程序打包成软件,请参考:https://mp-new.csdn.net/mp_blog/creation/editor/116641563 本人也是刚学习QT,欢迎大家交流、留下宝贵意见
(图片来源网络,侵删)


0 评论